How to install your Markhor3D D7500 on CURA
NOTE: For video tutorials, visit Youtube: Click Here
Go to windows device manager and plug in your Markhor3D to your computer using a USB cable. The list of devices should flash and a new CP210x UART Bridge Controller device should appear under Ports. If it appears under Other devices, you need drivers that can be downloaded
from https://www.silabs.com/…/sof…/CP210x_Windows_Drivers.zip
Once the drivers are installed, download Ultimaker CURA from https://ultimaker.com/software/ultimaker-cura, install it, and run it.
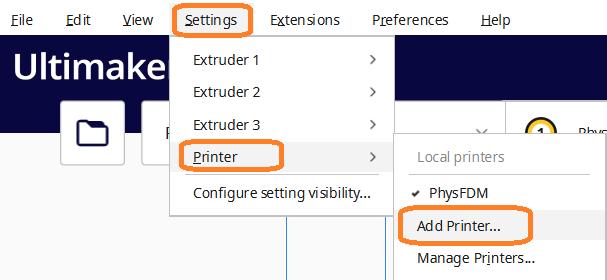
Start adding a new printer from Settings > Printer > Add Printer

Select Add a none networked printer > Custom > Custom FFF Printer and add the printer name as Markhor3D.

Change the following Parameters and leave the rest to default.
Y (Depth) > 150

Start G Code for improved printing
I’ve added pre-build hot-end tip cleaning for Markhor3D and a faster start sequence. You may like to replace your existing G Code in Cura > Settings > Printers > Manage Printers > [Markhor3D activated] > Machine Settings > Start G-Code
M104 S{material_print_temperature_layer_0};; Begin Heating
G91 ; Relative coordinates
G1 Z10 ; Lift the head abit
G90 ; Back to absolute coordinates
G28 ; Home All
G1 Z10 F500; Dont want to burn the bed while heating
M109 S{material_print_temperature_layer_0}; Wait for pre-heat
; Prime the extruder
G92 E0; Set Extruder position to be 0
G1 E5 F100 ; Extrude a bit in the air
G1 X0 Y5 Z0.1 F500; Touch Down
G92 E0; Set Extruder position to be 0
G1 X100 Z0.3 E10 F500; Nozzle wipe
G92 E0; Set Extruder position to be 0

End G Code for improved printing
M104 S0
;Retract the filament
G92 E1
G1 E-1 F300
G1 X0 Y140
G1 Y150 F4000
M18 X Y E
M18 S36000

Extruder 1 > Compatible Material Diameter > 1.75


Press Next.
To make sure that your printer is connected, you may go to the Monitor screen in cura to see if you can see your Printer’s control panel.


Congratulations! You can now Slice and send prints to your Markhor3D using Cura.
-
Posted in
d6500


